Rewards
Project Intro
Tutorial and Introduction by Marina Krinsky
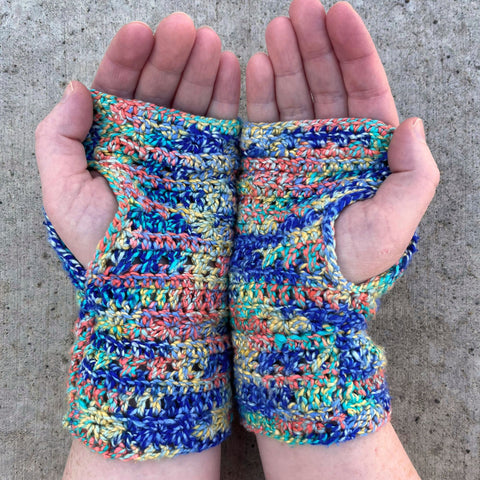
As soon as I saw the March Yarn of the Month - Rain Boots, I knew I had to make a pair of fingerless mitts. My favorite pair uses the star stitch almost exclusively, and I fell in love with the star stitch while I was making them. But I wanted something a little more varied; I love how the star stitch shows up among rows of other stitches. So I played around until I had a look I liked. The Star-Crossed Fingerless Mitts came to me very quickly, almost as if the pattern was already there in the yarn and just needed me to discover it.
Pattern Information
Craft: Crochet
Sizing: One size fits almost all
Finished Measurements: Finished gloves are approximately 4 inches across the palm and 6.5 inches tall, but there is a fair amount of stretch.
Stitch Gauge: 18 sts by 11 rows in dc = 4x4 in
Stitch Abbreviations to Know:
- ch = chain
- sc = single crochet
- hdc = half double crochet
- dc = double crochet
- fsc= foundation single crochet
- stacked dc = stacked double crochet
- beg star st = beginning star stitch
- star st = star stitch
- crossed dc = crossed double crochet
- st = stitch
- sl st = slip stitch
Special Stitches for this Pattern:
-
Stacked Double Crochet: At the beginning of a row, without chaining, make a sc in the first stitch. Insert hook between the legs of the sc just made and sc again on top of the sc just made. This replaces a turning chain on a dc row.
-
Beginning Star Stitch: Ch 3. Insert hook into second ch and pull up a loop. Insert hook into next ch and pull up a loop (3 loops on hook). Insert hook into the first stitch from the row below and pull up a loop. Pull up a loop in each of the next 2 stitches. You should have 6 loops on your hook. Yarn over and pull through all 6 loops. Ch 1 to close the stitch and create the “eye” of the star.
- Star Stitch: First row: Insert hook into the eye of the previous star st and pull up a loop (2 loops on hook). Insert hook under the last spike of the previous star and pull up a loop. Pull up a loop in the same stitch the last leg of the previous star was made. Pull up a loop in each of the next 2 stitches (6 loops on hook). Yarn over and pull through all 6 loops. Ch 1 to close the stitch and create the “eye” of the star.
- Crossed Double Crochet: Skip 1 stitch. Dc in the next stitch, then dc in the skipped stitch.
Helpful Tips:
- Second row: 2 hdc in the eye of each star stitch. I have written the row instructions in the pattern for ease of keeping track of row count.
- Ch 2 counts as hdc throughout
- Ch 1 does not count as a stitch
- Alternative to fsc: you can chain 36 and sc in 2nd chain from the hook and each remaining chain. Make sure to chain loosely, as this won’t have as much stretch as fsc.
- Alternative to stacked dc: ch 3. This counts as a dc.
- Project is worked flat and then seamed.
- If you need a slightly wider mitt, increase the starting fsc by 4. You will need to add 2 extra star stitches in each star st row and 2 extra crossed double crochets to each crossed dc row (one on either side of central dc). To increase the length of the mitt, add another repeat of rows 1-6.
Tools and Materials
- 1 Skein of Darn Good Twist - Sport Weight Silk Yarn (I used the colorway Rain Boots)
- Size D (3.25mm) crochet hook
- Crafting Scissors
- 4 Stitch markers
- Yarn needle (for weaving ends)
Get the yarn used in this pattern
The Pattern
Step 1: Crocheting the Gloves
- Begin: Fsc 35, turn.
- Row 1: Beg star st, 15 star st, hdc in last, turn.
- Row 2: Ch 2, 2 hdc in the eye of each star st, 2 hdc in last, turn.
- Row 3: Stacked dc, dc across, turn.
- Row 4: Ch 2, hdc across, turn.
- Row 5: Stacked dc, 8 crossed dc, dc in next, 8 crossed dc, dc in last, turn.
- Row 6: Ch 2, hdc across, turn.
- Rows 7-18: Repeat rows 1-6 twice more.
- Rows 19-20: Repeat rows 1-2.
- Row 21: Ch 1, sc across. Do not cut yarn – go on to finishing.
Step 2: The Finishing Touches
- Making sure not to pull out the working loop (I put a locking stitch marker to hold it), fold in half with the top corners together and bottom corners together, right sides facing. Using stitch markers, mark where you want the thumb opening to start and end (approximately 1.5” from the top and 3” from the bottom, but you can customize this to make the thumb opening as big/small and as high/low as you prefer).
- Sl st through both layers to the first stitch marker and finish off. Rejoin yarn at the bottom and, making sure to go through both layers, sl st up to the other marker. You now have a tube with a hole for the thumb.
- Weave in all ends and turn the mitt right side out.
- Join yarn at the bottom of the thumb hole and sl st evenly around the hole, making sure not to make it too tight. Finish off and weave in any remaining ends.
And just like that, you have your Star-Crossed Fingerless Mitts!